
Photoshop Tutorial
Simple Planet
This tutorial will allow you to create a simple yet effective planet in Photoshop.
All tutorials are made in Photoshop CS4 on a Mac.
Step 1.
First things first, you will need to find a nice texture for you planet. You can do this by googling "Planet texture" and selecting
the one you like. Once you have this, open it in Photoshop and select Edit > Define pattern, give the pattern a name and
press OK. Now it's time to make the planet.
Step 2.
Create a new document in Photoshop of at least 500px by 500px, and fill it black.
Step 3.
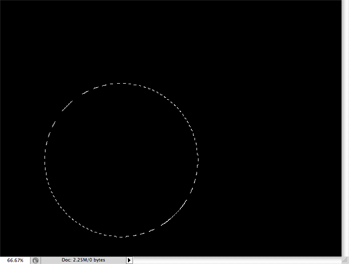
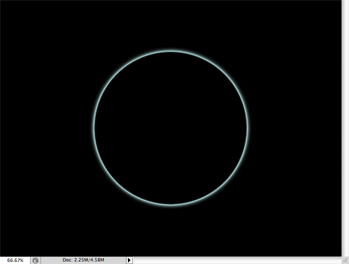
Create a new layer, select the Elliptical Marquee tool and draw out a circle. Holding down Shift when you do
this will make the selection a perfect circle. Once you have the selection, fill it with black (keep the selection active).
You should have something like the image shown. This is going to be your planet, so you may want to name the layer as such.
Step 4.
Now to start making the planet. Select the Brush tool, make it quite large, around 300px, and pick a soft brush. Set the
opacity to 30% and the mode to Linear Dodge.
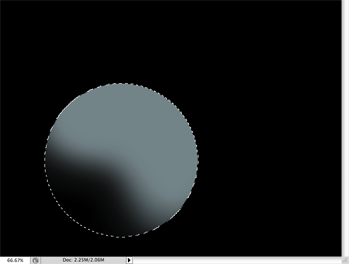
You want to decide on where you want the light source to be coming from and "paint" the rest of the planet, leaving a small dark patch where no light would be.
As you can see from the image, I have the light coming from the top right, so have left the bottom right of the planet black. When paining the planet, it is best to paint in a circular motion from one side to the other.
Step 5.
Now it's time to add some texture. Keeping the brush set as it was in Step 3, open your Brushes, you can do this
by going to Window > Brushes. From there, you can select your planet texture (under texture) which you set as a pattern earlier.
Step 6.
Now just repeat what you did in Step 3, paint the planet with the texture, applying a little more to the side that will have the light and
leaving the other side black.
After you have done that you should have something looking like this image. Now it looks a little more like a planet, but not much. You should also still have the marquee selected
Step 7.
Time to make it look more like a planet. With the planet layer still selected, go to Filter > Distort > Spherize. Set the
Amount to 100% and press OK. Repeat this but change the Amount to 50%.
Step 8.
The edges can be a little pixely at this stage, so on the planet layer, select Edit > Cut, paste this into a new layer and delete the layer
that you just cut it out from. This makes the edges smoother.
Now your planet looks more like a planet and less like a circle.
Step 9.
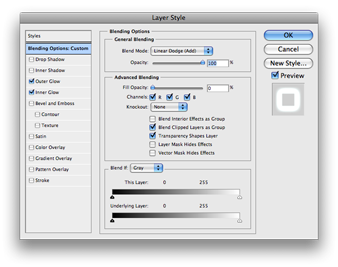
Your planet looks nice, but it is a little void of atmosphere, so lets add some. First, duplicate the planet layer an name it "Atmosphere". Bring up the layer
properties by going to Layer > Layer Style > Blending Options. (You can get to this by double clicking the layer in the layer window
too).
In Bending Options set the Blend Mode to Linear Dodge and the Fill Opacity
to 0%.
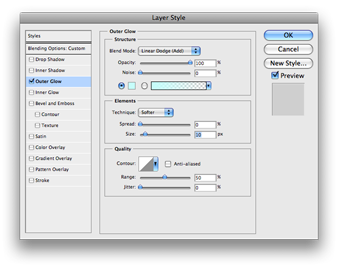
Next, under Outer Glow set the colour to a colour of your choice, usually similar to the planets colour. Set the Size
to 20. If you want more atmosphere, just increase the Size.
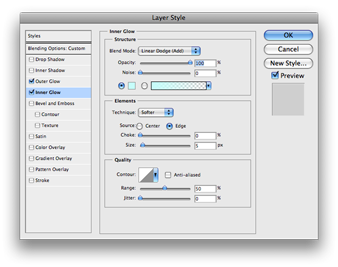
One more, under Inner Glow set the colour to the same colour as you did for Outer Glow. Set the
Size to 5.
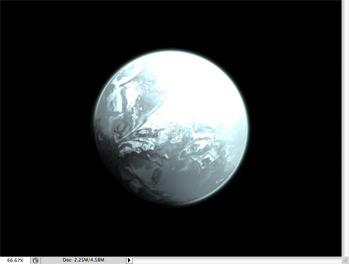
Step 10.
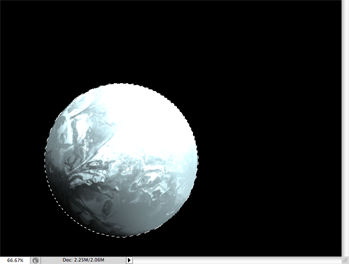
Your planet now looks like it has some atmosphere, but unfortunately too much. Lets remove some. Create a new layer above your "Atmosphere" layer, link
this to the layer below and then merge the layers together. This gives you the atmosphere on its own and not with the planet, like the image shown. Good idea to rename
it to "Atmosphere"again
I've hidden the planet layer to show the effect of the atmosphere layer on its own.
Step 11.
Take a large Eraser tool, like you did with the brush in Step 3, and start to remove the atmosphere around the
darkened area of your planet. Since the area is in the shadows, no atmosphere will be visible. Don't erase too much from the sides as it will look like there is no
atmosphere around there. You want it too still look like the atmosphere is all around the planet, just not shown in the shadow.
You should now have something that looks like the image here.
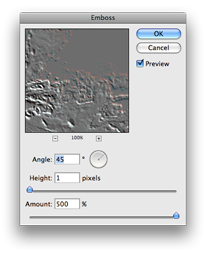
Step 12. Time to add detail to the planet. Whilst the planet is nice and round, the features still seem flat, so lets do something about that. At this point, you should have three layers, "Background", "Planet" and "Atmosphere". Duplicate the "Planet" Layer. Go to Filter > Stylize > Emboss.
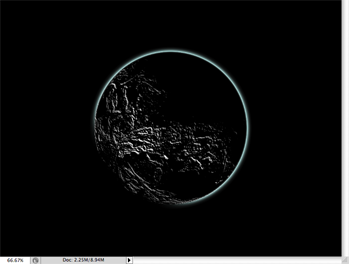
Step 13.
Now you have this embossed layer, Desaturate it by going to Image > Adjustments > Desaturate, then make a copy of the layer so that you
have two of them.
Step 14.
The reason for the two layer in the last step, is that we want to play around with the light and dark parts separately. Name one of your layers "Shadows" and
the other "Highlights".
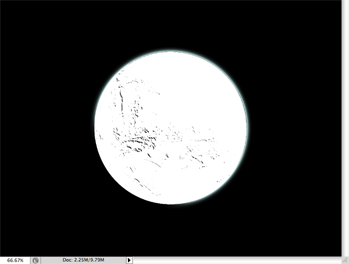
On the "Highlights" layer, select Image > Adjustments > Levels and now experiment with the levels, isolating the lightest
areas of
the planet. Do this by sliding the black slider on the right across until you get only the whitest areas. These are your highlights.
Once you are done, you should have something like this.
Step 15.
Now it's time to do the same for the "Shadows" layer.
On the "Shadows" layer, select Image > Adjustments > Levels and now experiment with the levels, isolating the darker areas
of the planet. Do this by sliding the white slider on the left across until you get only the blackest areas. These are your shadows.
Once you are done, you should have something like this.
Step 16.
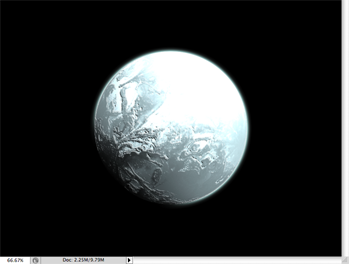
Nearly done, we just need to make a few finishing touches. First, change your "Highlights" Layer Mode to Linear
Dodge and set the Opacity to 50%.
On the "Shadows" layer, set the Layer Mode to Multiply and and set the Opacity
to 70%.
Once you have done that, you will have something that resembles what I have shown to the right. You can now place the Planet in a lovely space scene, or just make one around the planet with more layers.
All tutorials are made in Photoshop CS4 on a Mac.