
Photoshop Tutorial
Space Nebula
This tutorial will show you how to make a beautiful looking space nebula scene.
All tutorials are made in Photoshop CS4 on a Mac.
Step 1.
First things first, Create a new document in Photoshop and fill it black.
Step 2.
Create a new layer and name it "Clouds1". Next you need to select a colour for the foreground. Leave the background black.
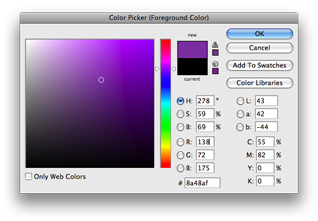
I chose a nice purple like the one in the image.
Step 3.
Go to Filter > Render > Clouds. It looks nice, but we can do more.
Step 4.
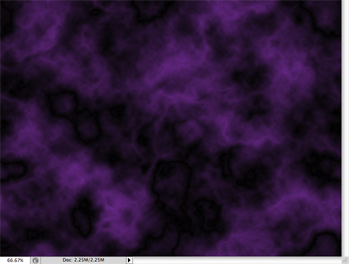
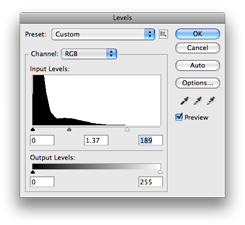
Now click Filter > Render > Difference Clouds. Do this 2 or 3 more times until you get something you like. (You can just press
cmd & F to repeat the last Filter action). To get a little more diversity, you can go to Image > Adjustments >
Levels to make some slight alterations too, just to either darken or lighten the clouds.
Once you have done this, you should have something like this.
Step 5.
Create a new layer and name it "Clouds2". Repeat Step 4 but with a second foreground colour. It can be any colour you like, experiment
with different combinations, this is your choice and you can come up with some very interesting combinations. Use Image > Adjustments > Levels
again to make minor adjustments to the colour.
If you wanted, you could add a third Cloud layer in yet another colour, but don't go overboard. Two cloud colour's seems to be about right.

Step 6.
Now set the Layer Mode on the top cloud layer to Screen, this allows the layer below to show through.
Step 7.
Its a bit crowded, lets remove some of the clouds. Select the Eraser tool, make it large (300px) set the Opacity
to 50% and the Flow to 50%. Now just go around and remove some of the clouds. Again, you can do what you like here, make it look interesting.
Do this on the other Cloud layer as well.
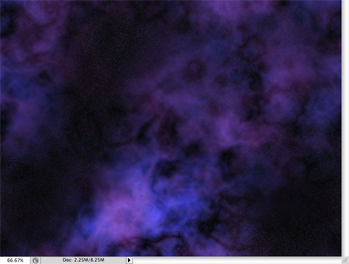
After you are done, you will have something that looks along similar to this.
Step 8.
You could leave it as it it, but you can add one extra touch to just finish it off.
You should have a black layer underneath the two cloud layers, lets use this. On this layer, go to Filter > Noise > Add Noise. Set the
Amount to 15%, make sure it is set to Guassian and Monochromatic.
You will now see a lot of "stars" on your image, a little too many, so again, take your Eraser tool, with the same settings from
Step 7 and start to remove some of the stars. Again, be creative. Once you are done, you will need to set the Layer Mode
of the other cloud layer to Screen.
You should now have something that looks like the image below.
All tutorials are made in Photoshop CS4 on a Mac.