

Photoshop Tutorial
Exploding Planet
In this tutorial, I will show you how to make a very cool looking exploding planet.
All tutorials are made in Photoshop CS4 on a Mac.
Step 1.
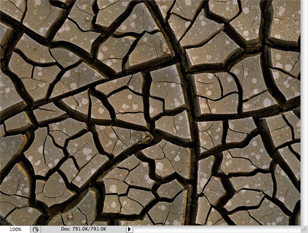
Before we start making the planet, you will need to get an image from the net. Go to google, or your favourite search engine and type in "Dried Cracked Mud".
Pick one that you like and save it.
I chose this one.
Step 2.
Open up the image that you just saved in Photoshop. Then create a new document (800px by 600px or more).
Copy the Mud image ( Edit > Copy) and paste this into the new document you created (Edit > Paste).
Step 3.
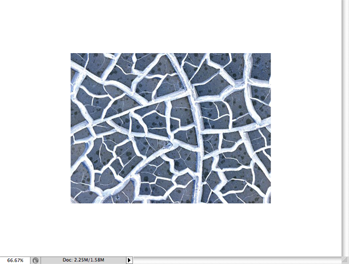
We want the cracks to be light for this to work, so go to Image > Adjustments > Invert.
You should have something that looks like this.
Step 4.
Select the Elliptical Marquee tool and draw a circle in the middle on the image (hold Shift to get a perfect
circle.)
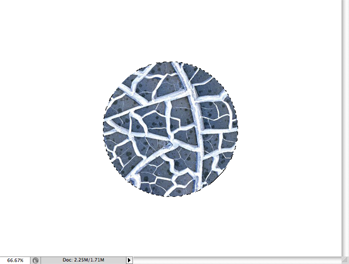
Step 5.
You need to invert the selection, (Select > Inverse), then remove the area that is now selected. You can either cut it out
(Edit > Cut) or just use the Backspace/Delete key. if you use the cut method, you will need to reselect the
circle shape. To do this, you can simple hold down cmd and click on the layer thumbnail image in your Layer Panel.
If you used the Backspace method, then you will need to inverse (Select > Inverse) the selection again to get it back to the circle only.
You should have something that looks like this.
Step 6.
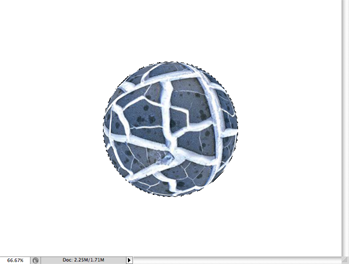
Time to spherize the planet. This is used in all planet tutorials to get the planet from this flat circle to a more rounded looking planet. Go to
Filter > Distort > Spherize and Set the Amount to 100%. Press OK.
As usual, do this one more time, Filter > Distort > Spherize changing the Amount to 50%. press OK.
This is where you should be at, very planetoid like.
Step 7.
Time to get to the good stuff. Now we are going to make the exploding effect. First, you should have a layer underneath you planet. Fill this with Black and flatten
the image (Layer > Flatten Image).
Step 8.
Next, go to Filter > Sharpen > Unsharp Mask and use the setting below.
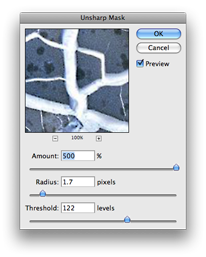
Amount 500%, Radius 1.7 pixels, Threshold 122
Step 9.
Time to make the explosion. Go to Filter > Distort > Polar Coordinates, check Polar to Rectangular, and press
OK.
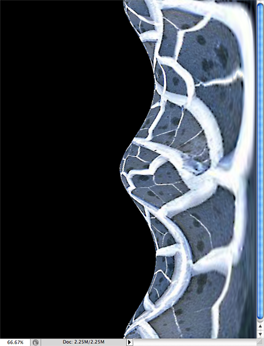
Step 10.
Next rotate the image, go to Image > Image Rotation > °90CW.
I know it all looks weird right now, but that is OK, we need it like this to do the next part.

Step 10.
Now, go to Filter > Stylize > Wind. Use the following settings, Method: Wind, Direction:
From the Right, and apply the effect.
Step 11.
For good measure, apply this filter once more, just press cmd and F.
If all has gone well, you should have an image that looks like this.
Step 12.
Before we move on, rotate the image back to its original position. Go to Image > Image Rotation > °90CWW.
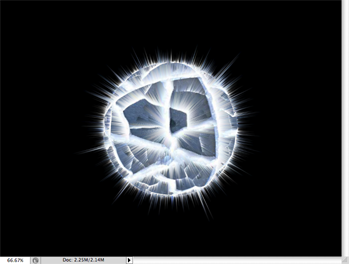
Step 12.
OK, lets get it looking like a planet again. Go to Filter > Distort > Polar Coordinates. This time, check Rectangular
to Polar and press OK. Yay, it looks like a planet again. 
Step 13.
Now all you need to do is give it some colour. There are two ways to do this.
1. Go to Image > Adjustments > Hue/Saturation. Check the Colorize box and just play around with the colours.
2. Go to Image > Adjustments > Color Balance. This seems to give you more control over what you can adjust. Use the Tone Balance section to select either Shadows, Midtones or Highlights. Play around with the sliders on each one to get some thing to your taste.
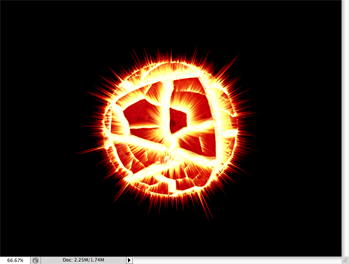
Step14.
Once you have found what you like, just press OK and you grey planet will transform into a lovely exploding planet, full of colour and life....well not life since the planet
just exploded, but it does look pretty.
Here is my finished image.
All tutorials are made in Photoshop CS4 on a Mac.