
Photoshop Tutorial
Planet Rings
This tutorial will show you how to add a nice set of rings to your planet.
All tutorials are made in Photoshop CS4 on a Mac.
Step 1.
OK, first create a new document (800px by 600px is good) and make the background black. Make sure your colour palette is set to White and Black.
Step 2.
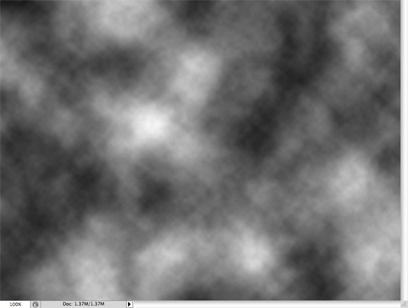
Now lets start making them. Go to Filter > Render > Clouds.
You now have a scene like the one in the image, it is time to make them into rings.

Step 3.
We want to make them more circular, so go to Filter > Distort > Twirl. Repeat this three or four times.
Once you have something that is nice and twirly, you are ready for the next part.
Your image should look similar to this one.
Step 4.
We need to get a ring out of that mess. There are two ways to do this. You can either take your Eraser tool and just
start to remove parts of the image. You want to remove the very middle of the image and the very outer edges so that it leaves you with a ring.
The other option is to use the Elliptical Marquee tool. Draw one circle that covers the middle, then cut that out
(Edit > Cut). Now draw a second circle, larger than the first, now invert the selection (Select > Inverse)
and then cut this out (Edit > Cut).
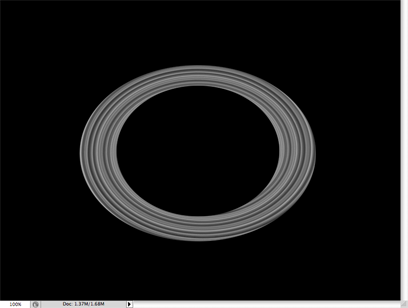
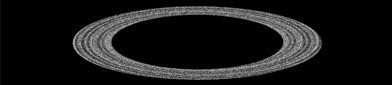
What you should end up with is something that resembles the image here.
Step 5.
At the moment it is a ring, but wouldn't fit round a planet in the way we want it to. So to fix that, we squish it. Go to Edit > Transform
> Scale. Now you just need to hold the top middle "grip" and drag it down until you have some thing like this.

Step 6.
OK, things look good, but it doesn't really look right, it's too solid, we need to break it up so that it looks more like individual rocks of the rings. To do this
just go to Filter > Noise > Add Noise. Use these settings.
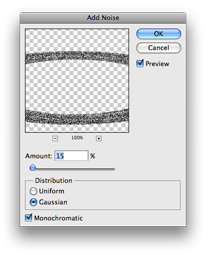
Amount 15%, Guassian, Monochromatic.
Press OK and you will see that the rings are now a lot more broken up.
Step 7.
This look more like a set of planet rings, but there may still be a few too many "rocks". So we can remove some, the amount you want is up to you.
Go to Image > Adjustments > Levels. Use the middle slider (the grey one) and slide it along to the right. The further you slide it
to the right, the less "rocks" you will have.
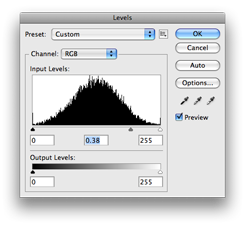
Press OK and you will see that the rings are now even more broken up.

Step 8.
Almost done, we just need to add a touch of colour to the "rocks". Go to Image > Adjustments > Hue/Saturation. This is
another point in which you can decide what you want. Check the Colorize box and then use the three sliders to select your colour. You can be
creative or jut go with a colour similar to the planet that you will be using.
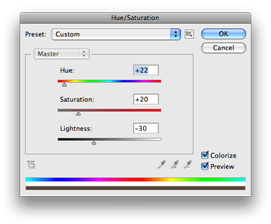
I selected a nice brown/rocky colour. Press OK and you will see your rings come alive with colour.

At this point, you can make another layer with a second set of rings to give them a slightly different colour, it all adds to the effect that the rocks are real. This is not necessary though.
Step 9.
Your rings are now ready to be placed onto your planet. Place the image into a new layer on your planet, and set the Layer Mode to
Screen. Make sure the Rings layer is above your planet layer. You will notice that all of the rings are showing, so you will need to
delete the ones that go around the back of the planet. Just take your Eraser tool and start to erase the rings that you should not be
able to see.
You may also need to use the Transform tool to resize the rings so that they fit around the planet. This is another point
in which you can experiment. Change the angle of the rings so that they are not horizontal.
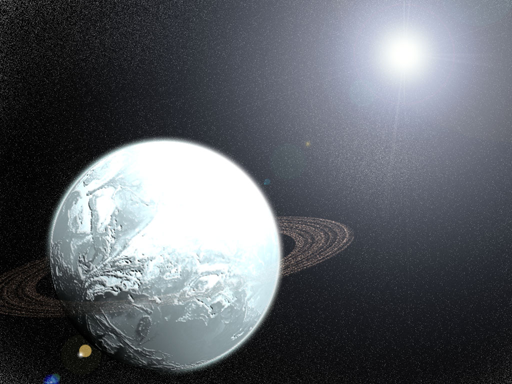
Here is one I made earlier
All tutorials are made in Photoshop CS4 on a Mac.