
Photoshop Tutorial
Lava Planet
I found this tutorial titled as a Realistic Sun, though to me, I think it works just as well as a molten/lava planet. It's a long one, but stick with it, the
result is very nice.
All tutorials are made in Photoshop CS4 on a Mac.
Step 1.
Open up a new document in Photoshop, make it 500px by 500px, and fill the background black.
Step 2.
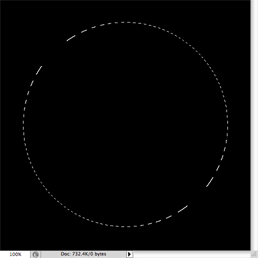
Create a new layer, then select your Elliptical Marquee tool and draw a large circle in the middle of your black background. Ideally it should
cover the majority of your image, but should leave plenty of room around the edges.
You should have something that looks like this. The same thing that all our planet tutorials start out like.
Step 3.
Once again we are using the Clouds render feature to make the planet. Go to Filter > Render > Clouds, and then Filter
> Render > Difference Clouds.
Step 4.
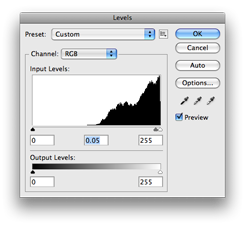
Next go to Image > Adjustments > Invert. We now need to bring the whiteness right out, so go to Image > Adjustments
> Levels. Grab the middle slider and bring it almost all the way down to the right, to about 0.05. (see below)
Step 5.
Now to make it look like a planet, we use the Spherize filter. Go to Filter > Distort > Spherize, set the Amount
to 100%. Repeat this once more, but change the Amount to 50%.
Step 6.
Go to Filter > Stylize > Find Edges, and press OK. Once again, invert the image by going to Image > Adjustments
> Invert.
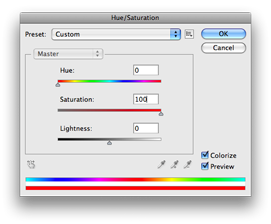
Bring a little colour to the image now, go to Image > Adjustments > Hue/Saturation. Check the Colorize box and
set the Saturation to 100. Click OK.
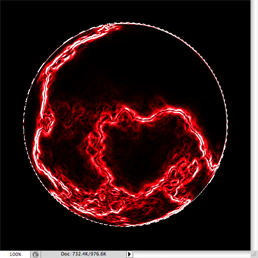
Your image should now look similar to the one shown to the right.
Step7.
You now want to duplicate the layer you have been working on. Go to Layer > Duplicate Layer. Now go to
Image > Adjustments > Hue/Saturation. Check the Colorize box and this time you want to set the Hue
to 40 and the Saturation to 100.
Step 8.
At this point you should have three layers, a "Background", "Layer1" and a "Layer1copy". Change the Layer Mode
on your "Layer1copy" layer to Linear Dodge, then merge this (Layer > Merge Down) to the layer below.
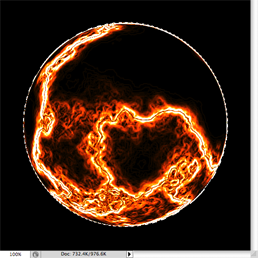
If you have done this all correctly, you should have something that looks like this.
Step 9.
If you managed to follow the first 8 steps OK, then the rest should be a breeze, as you are pretty much just repeating them.
Step 10.
Go to Image > Adjustments > Invert, and then Image > Adjustments > Levels. Like before, bring the middle
slider down to 0.05 and press OK.
Step 11.
Go to Filter > Distort > Spherize >, set the Amount to 100%, then repeat once more,
this time setting the Amount to 50%.
Step 12.
Now, go to Filter > Stylize > Find Edges and press OK. Next, go to Image > Adjustments > Invert.
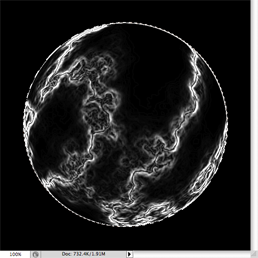
At this point, you image should look like the image on the right.
Step 13.
Go to Image > Adjustments > Hue/Saturation. Check the Colorize box and set the Saturation
to 100. Click OK.
Step 14.
Once again, duplicate the layer (Layer > Duplicate Layer). Go to Image > Adjustments > Hue/Saturation.
Check the Colorize box and this time you want to set the Hue to 40 and the
Saturation to 100.
Step 15.
At this point you should have four layers, a "Background", "Layer1", "Layer2" and a "Layer2copy". Change the
Layer Mode on your "Layer2copy" layer to Linear Dodge, then merge this (Layer >
Merge Down) to the layer below.
Change the Layer Mode on your "Layer2" layer to Linear Dodge, then merge this (
Layer > Merge Down) to the layer below ("Layer1").
If you have done this all correctly, you should have something that looks like this.
Step 16.
Once again, we are going to repeat the whole process again.
Create a new layer, (I hope your circle is still active) and go to Filter > Render > Clouds, then Filter > Render
> Difference Clouds.
Step 17.
Go to Image > Adjustments > Invert, and then Image > Adjustments > Levels. Like before, bring the middle
slider down to 0.05 and press OK.
Step 18.
Go to Filter > Distort > Spherize, set the Amount to 100%, then repeat once more,
this time setting the Amount to 50%.
Step 19.
Now, go to Filter > Stylize > Find Edges and press OK. Go to Image > Adjustments > Invert.
Step 20.
Go to Image > Adjustments > Hue/Saturation. Check the Colorize box and set the Saturation
to 100. Click OK.
Use these settings
Step 21.
Once again, duplicate the layer (Layer > Duplicate Layer). Go to Image > Adjustments > Hue/Saturation.
Check the Colorize box and this time you want to set the Hue to 40 and the
Saturation to 100.
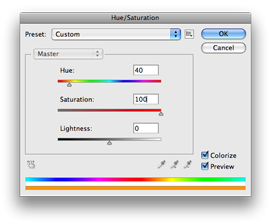
Use these settings
Step 22.
At this point you should have four layers, a "Background", "Layer1", "Layer2" and a "Layer2copy". Change the
Layer Mode on your "Layer2copy" layer to Linear Dodge, then merge this (Layer >
Merge Down) to the layer below.
Change the Layer Mode on your "Layer2" layer to Linear Dodge, then merge this (
Layer > Merge Down) to the layer below ("Layer1").
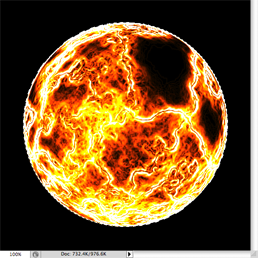
If you have done this all correctly, you should have something that looks like this.
Step 23.
Last time, I promise. Repeat the whole process again.
Create a new layer, (I hope your circle is still active) and go to Filter > Render > Clouds, then Filter > Render
> Difference Clouds.
Step 24.
Go to Image > Adjustments > Invert, and then Image > Adjustments > Levels. Like before, bring the middle
slider down to 0.05 and press OK.
Step 25.
Go to Filter > Distort > Spherize, set the Amount to 100%, then repeat once more,
this time setting the Amount to 50%.
Step 26.
Now, go to Filter > Stylize > Find Edges and press OK. Go to Image > Adjustments > Invert.
Step 27.
Go to Image > Adjustments > Hue/Saturation. Check the Colorize box and set the Saturation
to 100. Click OK.
Step 28.
Once again, duplicate the layer (Layer > Duplicate Layer). Go to Image > Adjustments > Hue/Saturation.
Check the Colorize box and this time you want to set the Hue to 40 and the
Saturation to 100.
Step 29.
At this point you should have four layers, a "Background", "Layer1", "Layer2" and a "Layer2copy". Change the
Layer Mode on your "Layer2copy" layer to Linear Dodge, then merge this (Layer >
Merge Down) to the layer below.
Change the Layer Mode on your "Layer2" layer to Linear Dodge, then merge this (
Layer > Merge Down) to the layer below ("Layer1").
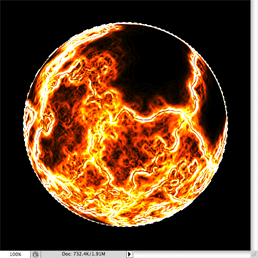
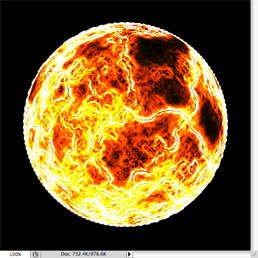
Your image should now look like the image on the right
Step 30.
Almost done, just need to add a little atmosphere/glow. Go to Layer > Layer Style > Blending Options, (You can get to this by double
clicking the layer in the layer window too). Go to Inner Glow. Set the Size to 20. Click the
colour picker and use the colour FFC600.
Whilst still in the blending Options pane, go to Inner Glow. Set the Size to
20. Click the colour picker and use the colour FFC600 like you did before.
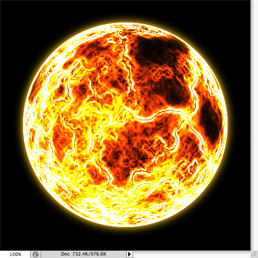
Deselect (Select > Deselect) and you image is now done.
Here is how mine turned out.
All tutorials are made in Photoshop CS4 on a Mac.