

Photoshop Tutorial
Striped Abstract Wallpaper
This tutorial will show you how to create a very simple but effective looking wallpaper. You can costomize it to the colour of you choice very simply.
This makes a great background for any image. Have fun.
All tutorials are made in Photoshop CS4 on a Mac.
Step 1.
Open a new document in Photoshop, for the purpose of the tutorial I created it 800x600, but you can make it any size you wish.
Step 2.
Once open, you now need to select the two colors that you wish to use in the image. I chose a nice blue for the forground and left the background colour
white, though you can select any two colours you wish. Now you are ready to go.
Step 3.
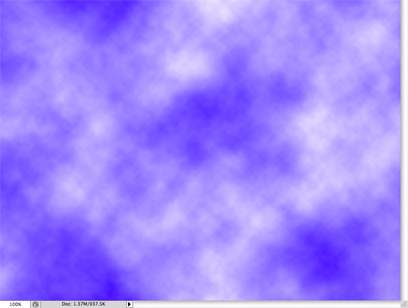
We will now use one of the most versatile filters in Photoshop, the Clouds filter. Go to Filter > Render >
Clouds, you will have something that resembles the image shown
Step 4.
Go to Image > Adjustments > Brightness/Contrast. Now set the Contrast up to 100.
Step 5.
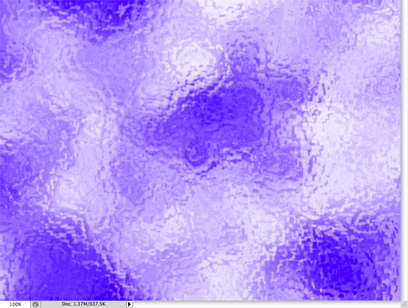
Time to make the effect. Go to Filter > distort > Ocean Ripple.
Set the Ripple size to 10 and the Ripple Magnitude to 15.
You should have something that now looks like the image shown. Don't worry, I know it doesn't look like it won't be striped, but we need to do this to make the next step which will make the stipes.
Step 6.
Time to add the stripes. To do this, simple go to Filter > Blur > Motion Blur and use the following settings.
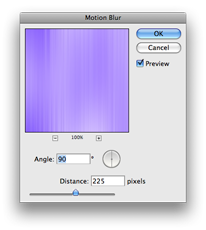
Angle 90°, Distance 255 pixels
Step 7.
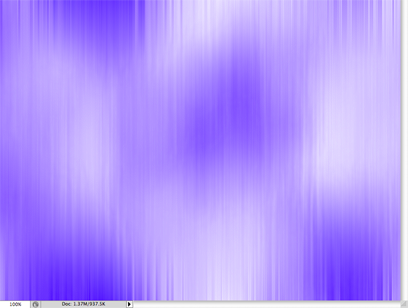
After applying the motion blur, you should now have something that looks like the image shown. All that is left to do is to make the lines stand out a little more than they
do now.
To do this, go to Filter > Sharpen. Repeat this twice or three times more to get the desired effect. You can repeat the last Filter effect by
simply pressing cmd + F.
You are now finished. Save your work and you can then use it however you wish. Below you will find the final image of the tutorial that I have been making here.

All tutorials are made in Photoshop CS4 on a Mac.